Website Bot Message
What is Bot Messages ?
It is a simple message by which BOT responds to a user's query.
There can be multiple ways through BOT responds known as types of bot messages.
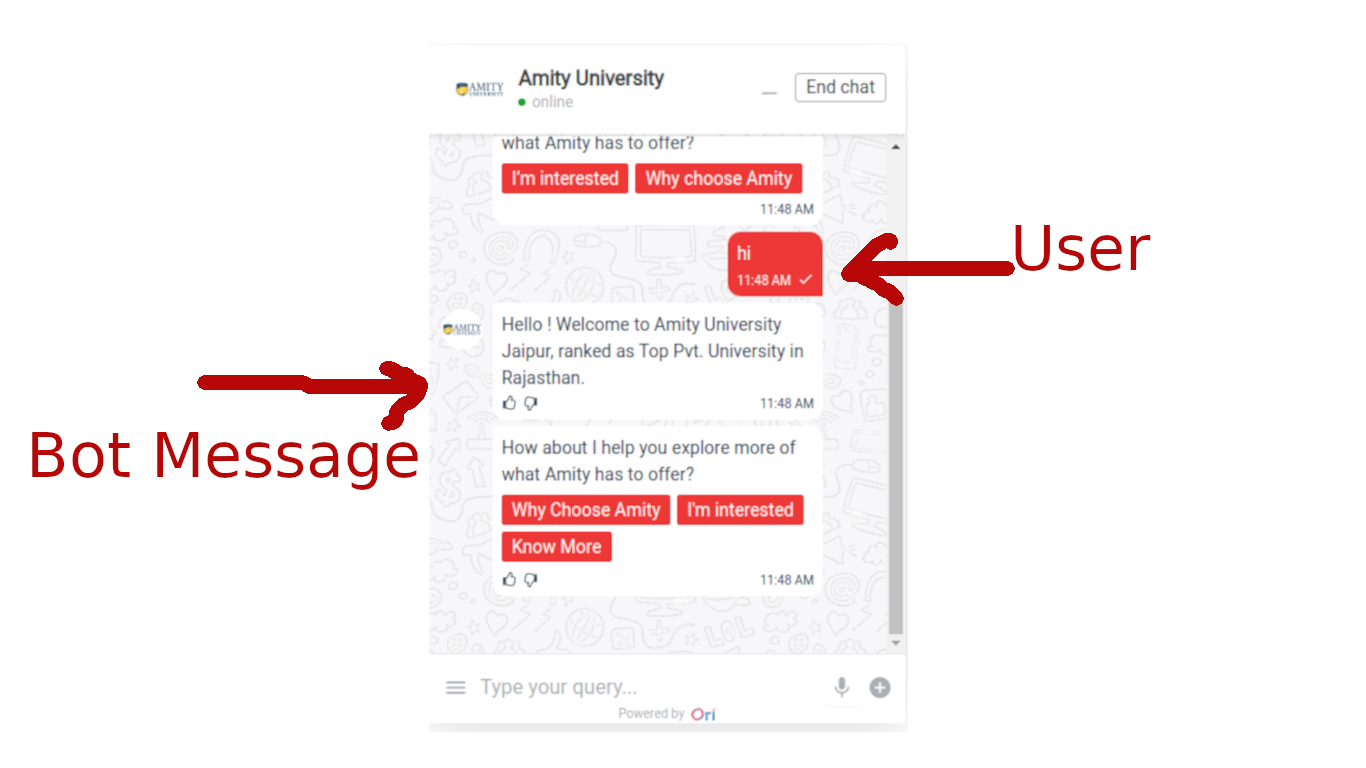
Here in this picture user tries to say "hi" to the BOT and BOT respond with a simple text message starting with Hello! Welcome to Amity University Jaipur.
There is also a message down next to Hello Response. (This contains text along with buttons that will be covered later.)
Types of BOT Messages
- Text
- Text with Buttons
- Images with Buttons
- Carousal
- Video
- Form
- Menu
- Checkbox
- Custom Messages (Actually, it is a kind of Message but we will see it along with other messages.)
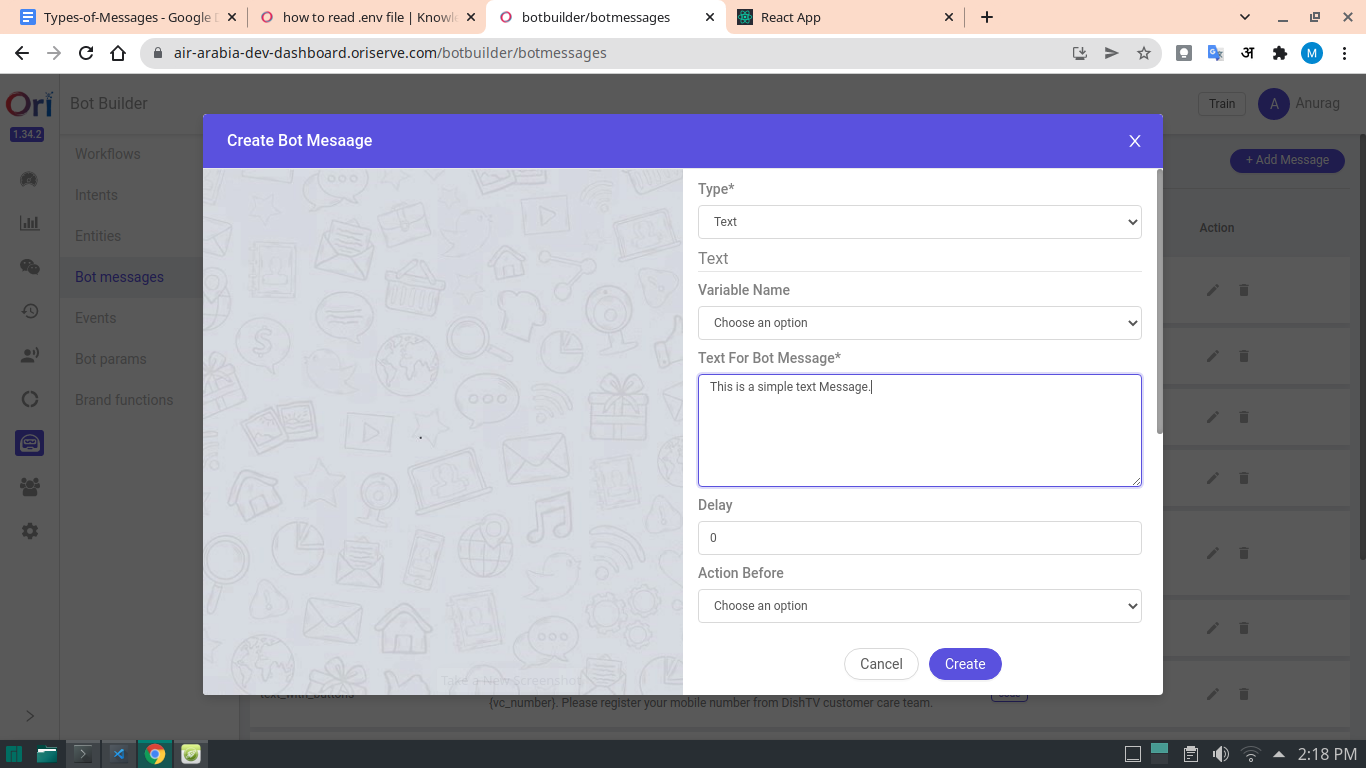
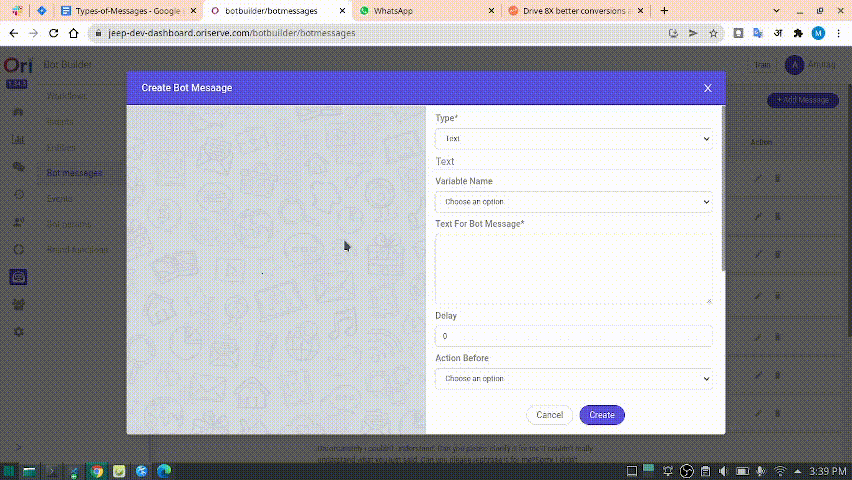
Where can I create these messages ?
Just open the dashboard and follow steps as shown in this video 📽
Common properties for all the messages that we be create from Dashboard as well as through
text
A simple text that we want to show in message
title
This is more like text. But since it is the title , that's why by default it will be in bold. compared to other texts.
subtitle
This is normal text but it will not be in bold.
variable_name
In this variable user response is saved. And will be immediately saved inside DB Where to find this ? -> Inside DB -> Go to chat_sessions collection -> Inside this, open current document -> Then inside this goto context_variables -> Inside this you will have your variable_name with value
skipLS
Full name Skip Language Service. As the name suggests, do not perform anything related to catching what the user wants to say(intention).
- use case :
- Whenever we want to get plain text from a user and to not to be recognised as user's intent by AI.
- use case :
input_lock :
Whether we want to lock the input field or not where user types
send_variable_to_apiai:
Whatever variable attached with any particular message. if the user responded to that message. User response will be stored to a variable and this is sent to AI if we set custom_message_doc.send_variable_to_apiai = true;.otherwise if it is false then variable will not be sent to AI.
delay:
After how much time we want this message to be displayed (must be in milliseconds)
action_before:
Same as we saw this like in the case of Dashboard. we can trigger a function just before displaying the message. And we do some pre work in that function.
Once this function resolves its purpose the message will be displayed.
const buyOnlineButtonFunction = async (socket, session_doc) => new Promise(async (resolve, reject) => {
   try {
      //function body

      // return resolve(session_doc); // if your task resolved
      // return reject(session_doc); // if your task failed
   } catch (error) {
       console.error(error);
       handleAppError({ error });
   }
});
buttons:
Do you want to add buttons with your message with full customization ?
Do this to add buttons along with your message in code
custom_message_doc.buttons = [
  {
    "text": "Button 1",
    "type": "default",
  },
  {
    "text": "Button 2",
    "type": "link",
    "url": "https://www.jeep-india.com/bmo-page.html#/vehicles"
  },
  {
    ... // add as many button you want in similar fashion
  }
];
tip
will see later how you can add buttons from Dashboard
How many types of buttons can we create ?
Default Button
- A simple button after pressed by user it will sent response on behalf of user
Link Button
- After clicking over this button a user will be redirected to given link in this button
customSocketEvent
A fully featured button type we can do so many things with this in place.
We can pass additional data into this type of button
{
    "text" : "Your text",
    "type" : "customSocketEvent",
    "eventName" : "buttonSelection",
    "relayData" : {
        yourkey: yourvalue
        ... add anything that you needed
    }
},We can trigger a specific intent when user clicks over this button
{
    "text" : "Your text",
    "type" : "customSocketEvent",
    "eventName" : "buttonSelection",
    "relayData" : {
        relay_intnet: "your_intent_name"
    }
},We can trigger a specific workflow when user clicks over this button
{
    "text" : "Your text",
    "type" : "customSocketEvent",
    "eventName" : "buttonSelection",
    "relayData" : {
relay_wid : 100,
relay_next_node : 1
    }
},
Tip Time
- Text
- Text with Buttons
- Images with Buttons
- Carousal
- Video
These Messages can be directly created from Dashboard as well as from Code Level. But Recommended way is Dashboard. (only if there is no dynamic content we have to send)
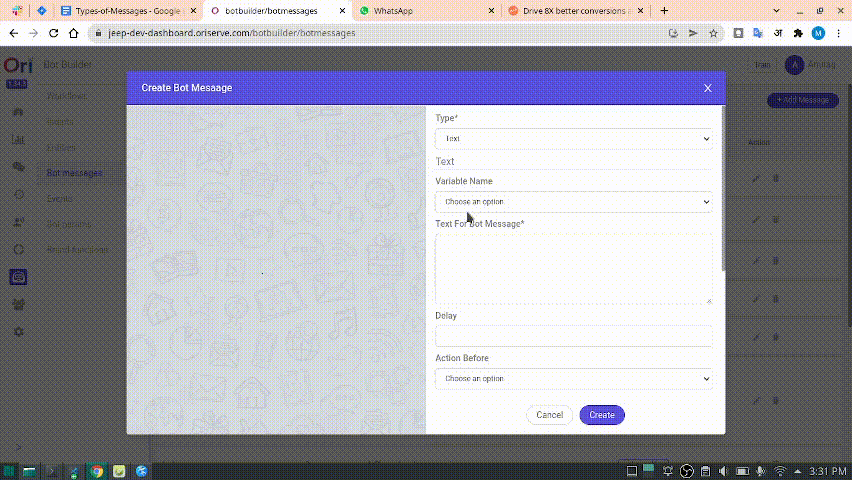
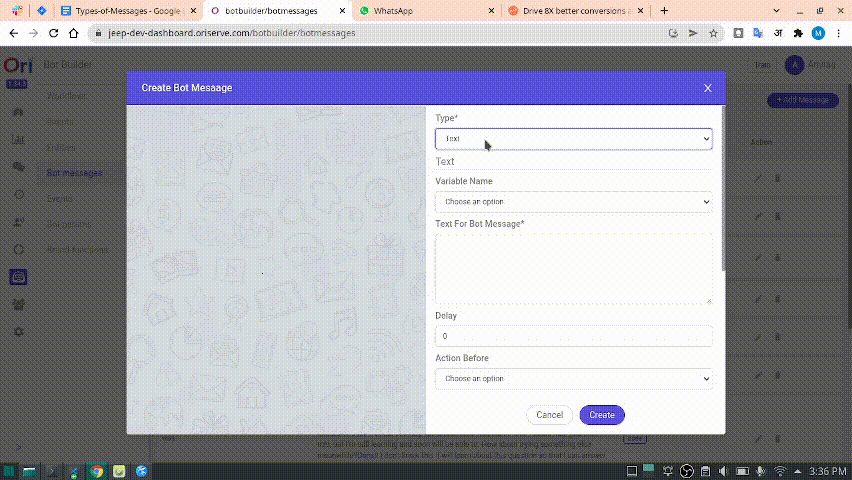
Text
Creating Text Message From Dashboard
Do you want to create dynamic message right from your Dashboard
While creating Text message give text something like this
Hello! My name is {user_name}. I am from {country_name}.
Do you know what will do this
At the time of execution of this message. If your context variable contains "user_name" or "place_name" property then these variables wrapped inside curly braces. Automatically gets populated with that value.
And Finally you will see that your message have text something like down below
Hello! My name is Mrityunjay Kumar. I am from India.
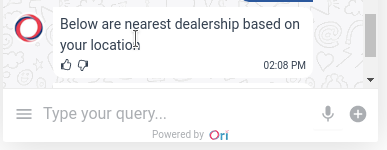
Creating Text Message From Code:
// get the id from DB of the particular message that we created from Dashboard
// (you can find it from -> inside DB -> messages collection)
session_doc = await genAndSendResponse(socket, session_doc, 'response', '61f62ec53af6cf4b8dd71c22');


// our own custom message

let custom_message_doc = {};
custom_message_doc.type = "text"; // type required of course
custom_message_doc.text = "Below are nearest dealership based on your location"; // required
custom_message_doc.send_variable_to_apiai = false;
custom_message_doc.skipLS = true;
custom_message_doc.variable_name = "hasDealer";
custom_message_doc.input_lock = false;

session_doc = await genAndSendResponse(socket, session_doc, 'response', null, custom_message_doc);
Output
Text with Buttons
Creating "Text with Buttons" Message from Dashboard
- Enjoy this video

- And yes don't forget to click over create button. 😂
Creating "Text with Buttons" Message from Code Level
let custom_message_doc = {}
   custom_message_doc.type = "text_with_buttons";
   custom_message_doc.subtitle = "Follow this link for your online booking."; // required field
   custom_message_doc.title = "";
   custom_message_doc.send_variable_to_apiai = false;
   custom_message_doc.skipLS = false;
   custom_message_doc.inputLock = false;
   custom_message_doc.text = "Follow this link for your online booking.";
   custom_message_doc.buttons = [
     {
       "text": "Button 1",
       "type": "default",
     },
     {
       "text": "Button 2",
       "type": "link",
       "url": "https://www.jeep-india.com/bmo-page.html#/vehicles"
     },
     {
      ... // add as many button you want in similar fashion
     }
   ];

   session_doc = await genAndSendResponse(socket, session_doc, 'response', null, custom_message_doc);
- Here, one noticeable point is that we must add subtitle property.
TAKE CARE
If your subtitle contains HTML or your text contains HTML do not forget to add these lines of code
   custom_message_doc.containsHtmlSubtitle = true; (must use, if subtitle contains html)
   custom_message_doc.containsHTML = true; (must use, if text contains html)
Output
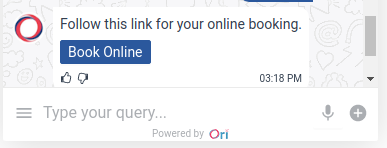
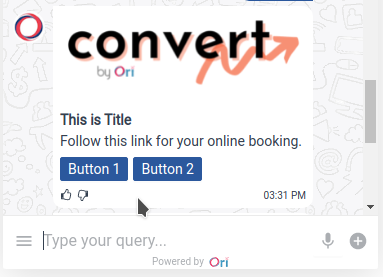
Image With Buttons
Creating "Image With Buttons" Message from Dashboard
- Enjoy this video
Creating "Image With Buttons" Message from Code Level
let custom_message_doc = {}
   custom_message_doc.type = "image_with_buttons";
   custom_message_doc.subtitle = "Follow this link for your online booking.";
   custom_message_doc.imageUrl = "https://knowledge-dev.oriserve.com/img/ori-logo.png";
   custom_message_doc.title = "";
   custom_message_doc.send_variable_to_apiai = false;
   custom_message_doc.skipLS = false;
   custom_message_doc.inputLock = false;
   custom_message_doc.text = "Follow this link for your online booking.";
   custom_message_doc.containsHtmlSubtitle = true;
   custom_message_doc.containsHTML = true;
   custom_message_doc.buttons = [
     {
       "text": "Button 1",
       "type": "default"
     },
     {
       "text": "Button 2",
       "type": "link",
       "url": "https://www.jeep-india.com/bmo-page.html#/vehicles"
     }
   ];

   session_doc = await genAndSendResponse(socket, session_doc, 'response', null, custom_message_doc);
wait, what has changed here ?
As we showed in text_with_buttons, here we are adding an image so for that we need to include the image along with the image's link.
Output
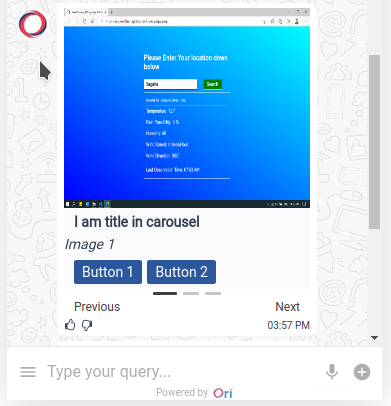
Carousel
Creating "Carousel" Message from Dashboard
- Enjoy this video
Creating "Carousel" Message from Code Level
- This carousel message is more like sliders. In each slider we can have
image
- n number of buttons
- Title
- Subtitle
Where can I use this ?
suppose you are working on a workflow and you need to show the multiple cities to user for selection. you can use this
const custom_message_doc = {};
   custom_message_doc.type = 'carousel';
   custom_message_doc.title = '';
   custom_message_doc.subtitle = "";
   custom_message_doc.send_variable_to_apiai = false;
   custom_message_doc.variable = '';

   custom_message_doc.options = [{
     optionInfo: { key: 'order' },
     title: "I am title in carousel",
     subtitle: `<em>Image 1</em>`,
     mediaType: "image",
     mediaUrl: "https://raw.githubusercontent.com/mrityunjay-1/projects-images/main/weather-app-img-2.png",
     containsHtmlSubtitle: true,
     buttons: [
       {
         text: "Button 1",
         type: "default"
       },
       {
         text: "Button 2",
         type: "default"
       }
     ]
   }, {
     optionInfo: { key: 'order' },
     title: "i am title in carousel",
     subtitle: `Image 2`,
     mediaType: "image",
     mediaUrl: "https://raw.githubusercontent.com/mrityunjay-1/projects-images/main/weather-app-img-2.png"
   }, {
     optionInfo: { key: 'Mrityunjay kumar' },
     title: "i am title in carousel",
     subtitle: `Image 2`,
     mediaType: "image",
     mediaUrl: "https://raw.githubusercontent.com/mrityunjay-1/projects-images/main/weather-app-img-2.png"
   }];
Output
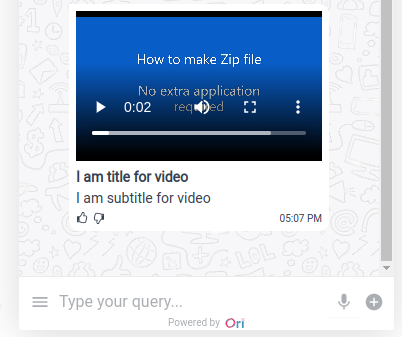
Video Message
Creating "Video" Message from Dashboard
- From dashboard it is easier to make. Did you try this one on your own?
- Believe me it's way easier than you think.
- Here are the Steps to follow:
- You just have to select message type
- Provide variable_name if you feel so
- Provide Title, Subtitle
- And lastly most importantly provide Video link
- And you are done. So cool isn't it ?
- Here are the Steps to follow:
- By the way enjoy this video
Creating "Video" Message from Code Level
  const custom_message_doc = {};
  custom_message_doc.type="video";
  custom_message_doc.title="I am title for video";
  custom_message_doc.subtitle="I am subtitle for video";
  custom_message_doc.send_variable_to_apiai = false;
  custom_message_doc.variable_name = "your variable";
  custom_message_doc.url = "http://examscuriosity.000webhostapp.com/projects/media/Zip_File.mp4";

  session_doc = await genAndSendResponse(socket, session_doc, 'response', null, custom_message_doc);
Output
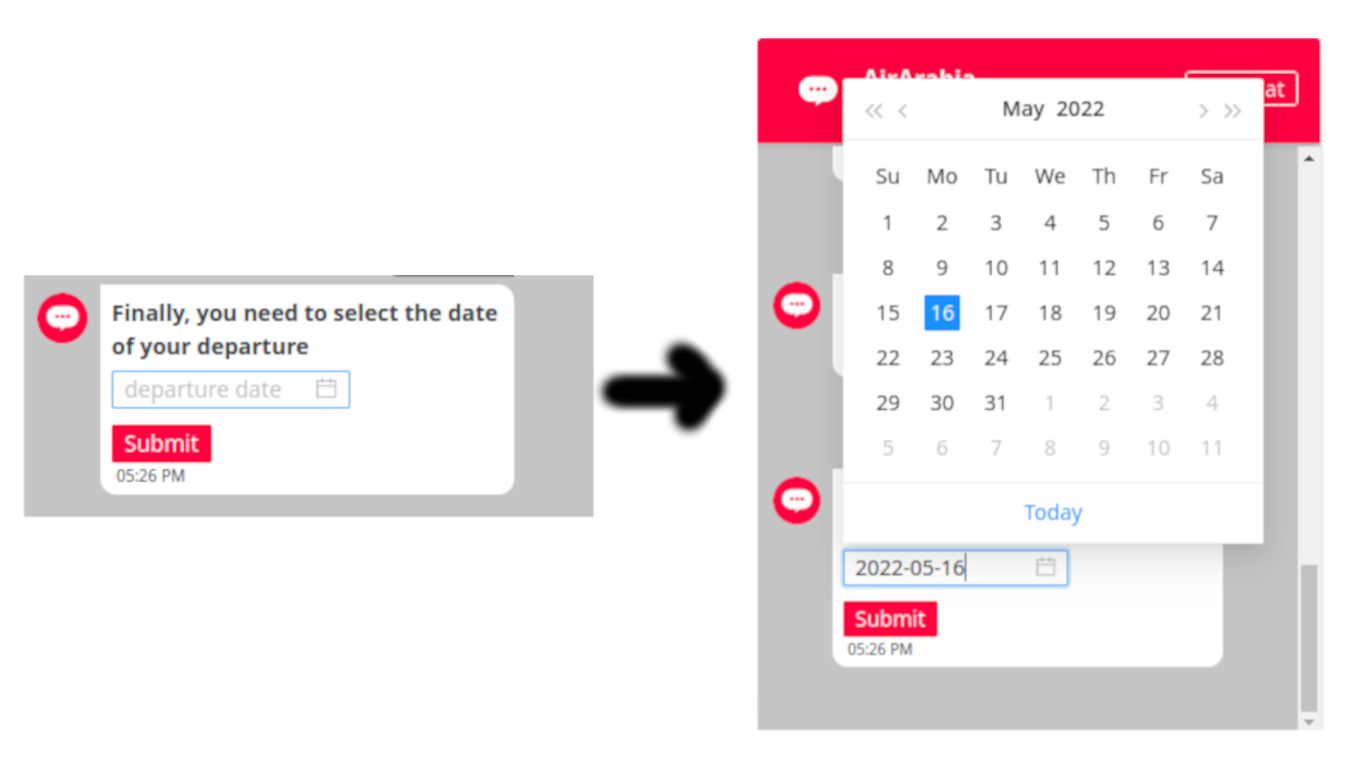
Date Picker Message
- This message is only available through code as of now
Creating "Date Picker" Message from Code Level
  // code example
  const custom_message_doc = {};
  custom_message_doc.type = 'form';
  custom_message_doc.title = 'Finally, you need to select the date of your departure';
  custom_message_doc.submitText = 'Submit'; // This is an optional parameter.Needed only if you want to customize submit button text. default is : Submit
  custom_message_doc.formData = [
      {
          type: "datePicker",
          title: "",
          disabledTimestamp: moment().subtract(24, 'months').valueOf(),
          props: {
              placeholder: "departure date",
              name: "departDate",
              required: true,
              format: 'YYYY-MM-DD'
          }
      }
  ]
  session_doc = await genAndSendResponse(socket, session_doc, 'response', null, custom_message_doc)
Set props accordingly for more customizability
- Placeholder (you can give any placeholder name)
- name (this is something with which you will be receiving user's response with this key in place)
- Date format (in which format you want to receive or show the data)
- Required (keep this true if you want from user that they must select any date, otherwise false)
How can i access / use the user response ?
- So whenever user responded to this message you will be getting value directly inside your context variable of that chat session.
OKAY, SO HOW DOES IT LOOK LIKE ?
- You will get two types of response inside your context
- First, with "list" key and dates selected by user (array) as "value"
"list" : [ "2022-05-17" ]
- Second, you will get response with "selectedData" key and object with keys that you specified under props for date picker form
"selectedData" : {
  "departDate" : "2022-05-17T12:00:17.085Z"
}
Output
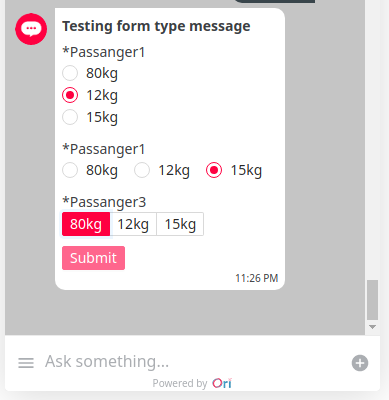
Form
This message might not be available through Dashboard.
Creating "Form" Message from Code Level
const custom_message_doc = {};
custom_message_doc.type = 'form';
custom_message_doc.title = 'testing form type message';
custom_message_doc.formData = [
   {
       type: "radioGroup",
       title: "Passanger1",
       vertical: true,
       props: {
           name: "bag1",
           required: true,
           options: [
               { label: '80kg', value: '80kg' },
               { label: '12kg', value: '12kg' },
               { label: '15kg', value: '15kg' }
           ]
       }
   },
   {
       type: "radioGroup",
       title: "Passanger1",
       props: {
           name: "bag2",
           required: true,
           options: [
               { label: '80kg', value: '80kg' },
               { label: '12kg', value: '12kg' },
               { label: '15kg', value: '15kg' }
           ]
       }
   },
   {
       type: "radioGroup",
       title: "Passanger3",
       props: {
           name: "bag3",
           required: true,
           size: "small",
           buttonStyle: "solid",
           optionType: "button",
           options: [
               { label: '80kg', value: '80kg' },
               { label: '12kg', value: '12kg' },
               { label: '15kg', value: '15kg' }
           ]
       }
   }
]

session_doc = await genAndSendResponse(socket, session_doc, 'response', null, custom_message_doc)

Output means Data that comes as response to this message stored in context_variables stores as

// Output:
// "selectedData" : {
//     "bag1" : "80kg",
//     "bag2" : "12kg",
//     "bag3" : "12kg"
// }
Ouput
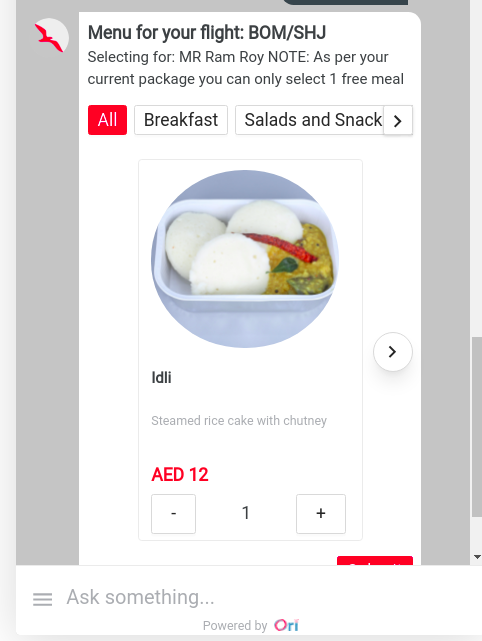
Menu
This message might not be available through Dashboard.
Creating "Menu" Message from Code Level
custom_message_doc = {}
custom_message_doc.type = 'menu'
custom_message_doc.title = `Menu for your flight:`
custom_message_doc.subtitle = `Selecting for: <br>NOTE: As per your current package you can only select 1 free meal`
custom_message_doc.catalogueCategories = ['random', 'dish']  //category buttons like quick replies
custom_message_doc.freeCatalogue = false //boolean (if true then we can only select one item for that)
custom_message_doc.containsHtmlSubtitle = true
custom_message_doc.variable_name = 'mealButton'
custom_message_doc.submitText = "Continue"
custom_message_doc.catalogueData = [
   {
       "itemId": "CZWW", //required
       "itemName": "Chicken zinger wrap and water", //required
       "description": "Crispy breaded chicken breast with light Aioli sauce in wrap with water", //required
       "validations": [
           1
       ],
       "charges": [
           {
               "amount": 0,
               "chargeBasis": "PER_PASSENGER"
           }
       ],
       "additionalInfo": null,
       "inventory": null,
       "mealCategoryId": null,
       "mealCategoryCode": "Sandwiches and Wraps", //required
       "mealImagePath": "https://reservations.airarabia.com/images/meal_14339.jpg", //either this
       "mealThumbnailImagePath": "https://reservations.airarabia.com/images/meal_Thumbnail_14339.jpg", //or this is required
       "popularity": "100",
       "available": 300,
       "allocated": 300,
       "categoryRestricted": false,
       "quantity":1 //required -> this will be zero by default
   }
]

session_doc = await genAndSendResponse(socket, session_doc, 'response', null, custom_message_doc)
Output
Checkbox
Creating "Checkbox" Message from Code Level
This message might not be available through Dashboard.
const options = [
   { label: '0', value: 'checkbox option 1' },
   { value: '1', label: 'checkbox option 2' },
   { value: '2', label: 'checkbox option 3' },
 ]

const custom_message_doc = {}
custom_message_doc.type = 'checkbox_with_media'
custom_message_doc.title = "Do you want to make the same meal selection for other passengers as well? You need to select from the passenger list below."
custom_message_doc.imageUrl = ''
custom_message_doc.options = options
custom_message_doc.buttons = buttons
custom_message_doc.variable_name = 'checkboxButton'
custom_message_doc.submitText = "Continue"
custom_message_doc.quickReplies = quick_replies

session_doc = await genAndSendResponse(socket, session_doc, 'response', null, custom_message_doc)
FAQs
How can i send messages created from Dashboard through our code ?
Whenever you are creating a message through dashboard it will be saved in Databases (obiviously). But here is the thing
You have to get the _id of that particular message.
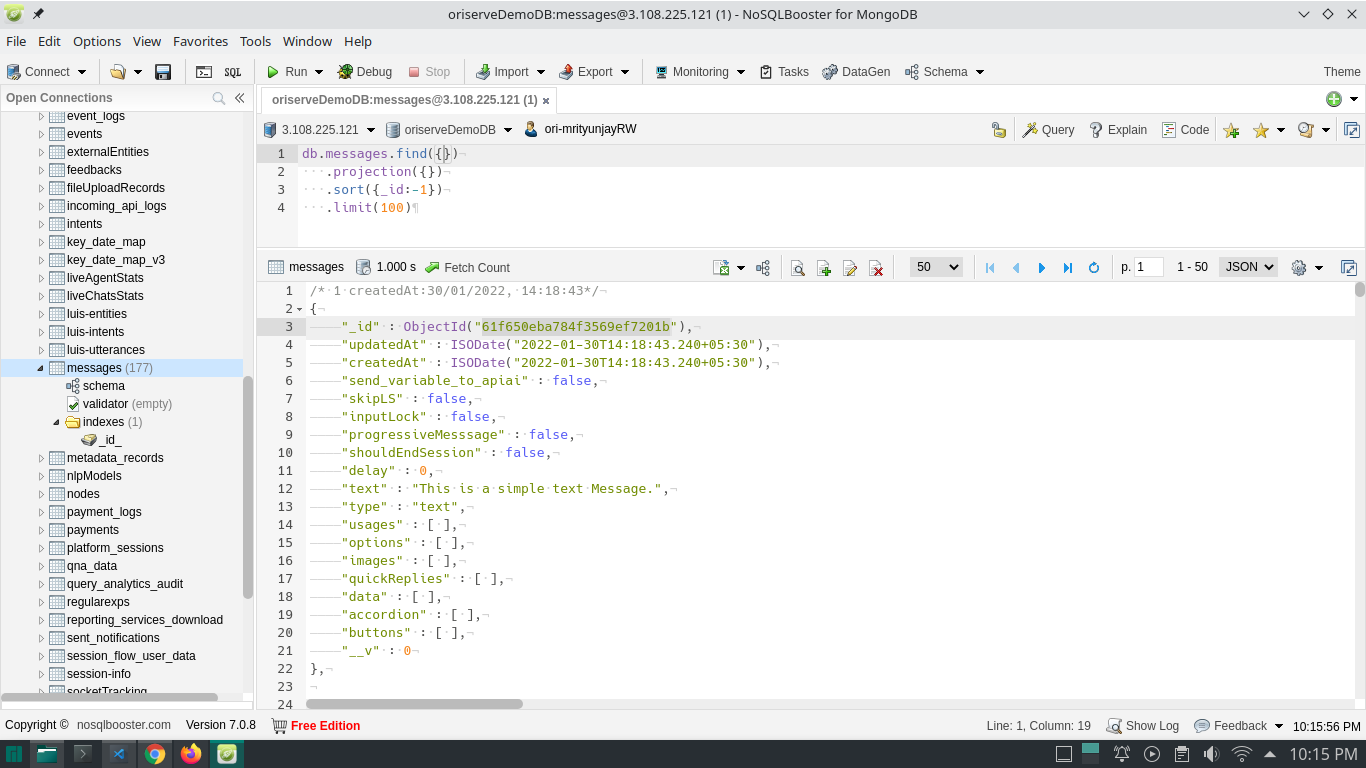
Where can i find the _id of that message ?
Open Database goto messages collection under that check your message that you created. copy the _id of that message.
// include this line of code inside your function or wherever you want to use.

session_doc = await genAndSendResponse(socket, session_doc, 'response', '{_id}');

//example
// session_doc = await genAndSendResponse(socket, session_doc, 'response', '61f650eba784f3569ef7201b');